Posts

Showing posts from 2017

Last Homework: Self Portrait in the Style of Alice Neel

Image
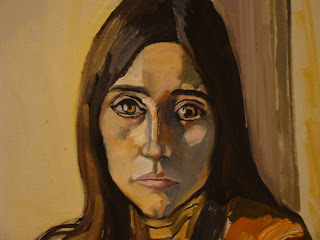
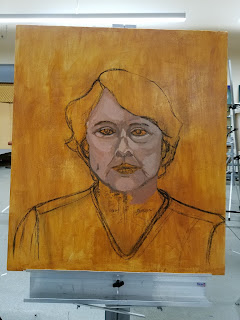
The challenge of our last homework project was to create a self portrait in the style of Another painter. I chose Alice Neal because my initial drawing had shade of her work.  The real challenge, after having worked so long on my realistic portrait, was to not stray away from the style I had chosen. I am not positive I have managed to meet that challenge. The following is one of Alice Neel's many portraits as well as her self portrait. Alice Neal was a well-known and prolific portrait painter, having painted portraits of Andy Warhol, for instance. Her influences were German and Euro-expressionist. Ironically for me, she shunned the impressionist artists that were such a strong influence on painters of that time. I too, am influenced strongly by Renoir and Monet.  So, It seemed a bit strange to be so drawn to her work. However, what drew me most to her work was the expression in the eyes. And that is where I tried to stay true in my painting. When I started this morning

Final Project: Last Class Workday

Image
Today was the final push. When we arrived, we were told it was time to add some cool highlights. Prof. Garguilo said he would come around and work with us individually, so I set forth with working on the background. After short discussion, we decided I should start by painting a thin coat of alizarin red onto the current background. That could then dry really well while I was working on the rest of the portrait, so when I did the glaze later, it would be ready. After painting on the alizarin red, I was really tempted to just leave it that color. However, it was time for me to work on smoothing the contours, so I had time to decide. I had chatted with Prof. Garguilo during the last class session about using dry-brushing to Smooth the contours, so the piece I was missing was how to mix the cool flesh-tones. I grabbed him quickly for a demonstration and then set to work.  The key here was to establish a range of flesh-tones that would ease the shadows Into the lights and then use a d

Final project: Self Portrait, Class 3

Image
We continued working on our self portraits today. I am struggling because I cannot visualize how to blend the contours. I did a lot of work today on fine details. The first thing I did was adjust the eyes. I had painted them too blue, so they needed to be adjusted. I added a little cadmium yellow to my blue to change the shade to one more slightly green. Then I worked on details with the irises. The result was far more realistic.  I will admit, getting these right was kind of weird for the rest of the class. I felt like I was being watched the rest of the day. I then moved on to the lips. I was told by many that I had the wrong color. And they were looking rather flat. So, I worked on these quite a while trying to get the values corrected so that they looked more like true lips. I am not sure they are quite there yet, but they look better. At this point, Prof Garguilo discussed with us what we will do with our background. This is when we found out one of the reasons for

Final Homework: Self Portrait in the Style of Another Artist

Image
The final homework project we have to complete is to do a second self portrait in the style of another artist. While Prof. Garguilo has not yet posted the artists we can use, he indicated that my drawing had elements of Alice Neel. So, I took a chance and looked up her work and realized he was right. So, I decided to go ahead and start painting in that style. Here is an example of her work: This painting was accessed from The Modern Art Museum's Pinterest page. So, I moved forward with the background first. On this canvas, I had drawn the painting on the primed canvas, rather than painting a background first. I decided to use a varied of the skin tone, similar to the above painting. I also went ahead and painted the sweater. I love the folds of the hood!. The rest of the time was spent with the proper contouring and shading. For a first round, I am pretty happy with the results. I obviously have to finish the eyes as well. If I understand correctly, the next step is o

Final Project: Day 2

Image
We started by watching a demonstration of how to blend skin tones. Then we were set loose to start our paintings. He encouraged us to concentrate on the facial shading, but because of our background washes, we all felt like the colors, which looked right on the pallet paper, made us look like zombies. My thought was that I looked like I had painted on face powder. It was rather disconcerting to many of us and soon we were wandering around trying to see if we were the only ones having that thought. After taking a break, I decided to fill in my shirt and hair, because I was pretty sure the issue was the orange wash background.  Once I did that, it did help a bit, but I also decided I did have some rosiness to my cheeks, so I added a bit of rosy color and it really woke up the painting. At this point, Prof. Garguilo said he thought it was coming along nicely, but that I need more value range, so the rest of class was spent remedying that and finishing my eyes and ears. In the en

Week 15: Self Portraits

Image
We began our last major project today during class. This will take at least four class periods.  We are doing self portraits. Not my favorite thing. However, at the beginning of class, Prof. Garguilo demonstrated his approach to drawing a self portrait with vine charcoal. His approach was to first lay out the proportions and then build the face from the center out. This made so much more sense to me than what I had been taught in all of my prior drawing classes. Before we started drawing, it was suggested that we paint a wash over the canvas to have a starting base. He used a wash of burnt sienna, but I felt that I have a more yellow base to my skin, so I mixed some yellow ochre with my burnt sienna. From there, we started laying out our faces. This is where mine started: Prof. Garguilo went around to each student and did some adjustments: In my case, he worked on my eyes. The rest of the class was spent adding details and values to the drawing. What I am pleased wit

Week 12: Stretching Canvas

Image
Today, we continued working on our canvases. I was a little late arriving, but saw most of the first demonstration.  Prof. Garguilo did a second canvas and then set us to work on our own. We worked in groups of three, and for our first, larger canvasses, that worked out great. The hardest part was learning to fold the corners. I am grateful for the fact that my first job required wrapping gifts, that mom made us learn to sew, and that origami was popular when we were kids.  It made it easier for me to figure out the folds.  Prof. Garguilo did tell us that if our fingertips weren't sore by the time we finished, we weren't stretching hard enough. Well, he was right! Not only were my fingertips feeling raw, but the next day the muscles in my fingers were achy. But I suspect I would get over that quickly if I were to do this on a regular basis. And speaking of that, while I was at Lowe's getting staples last night, I looked at miter saws and brad guns. Turns out, it would onl

Week 12: Making Frames

Image
Today, we had a blast making frames for stretching our own canvas. In the end, we will have made 2 canvases: 14" X 16" and 24.5" X 28".  We learned to use a miter saw and brad gun in the process.  It was a fun class!

Week 10 Begins: More Quick Paintings

Image
We started the day by critiquing our homework. It didn't even occur to me to put a table under my items.  Something I need to remember as we move on. As we did last week, we continued with monochromatic quick paintings. However, rather than using our Ivory black, we were instructed to get out our Ultramarine Blue and Burnt Umber. Turns out you can make fabulous bleach with these two colors. And not only that, you can tweak them to be warm or cold by adding more of one or the other.  That makes it easier to bring the focus forward or back (cold recedes, warm comes forward).  In the first painting, we had 2 items. We were instructed to paint quickly, but try to pay attention to negative space. I didn't quite manage to finish in the allotted time, however, it still is not bad. After then taking a break, Prof. Garguilo added a third item to the still life and we began again. This painting went more smoothly and I believe part of the reason is because I focused in close

Week 9 Homework

Image
As we started last Thursday, we were to gesso a canvas and then partition into quadrants. We were to find two contrasting items to paint in monochrome paintings, using 30 minutes for each painting. I had a hard time selecting my items, but finally decided on a white ramekin and a thermos.  I think the three paintings do show improvement, with the last being the best, but this is tough work in such a short period of time.

Week 9: Movie and Quick Paint

Image
On Monday, instead of painting, we watched a documentary about Spanish painter, Antonio Lopez Garcia, and his quest to paint a quince tree he had planted in his yard. The documentary showed all the preparations and measurements he had to do as he started and continued painting. Because of weather, the painting had to be stopped unfinished, however, he continued working, changing to graphite. It clearly showed the amount of work necessary to make a masterpiece. On Thirsday, we were instructed to take a blank canvas and break it into quadrants. Prof. Garguilo then set up a still life for each of us containing 2 contrasting objects. We were instructed to quickly (30 minutes) paint the still life in one quadrant. Then he reset the objects to a different configuration. We then had 1/2 hour to paint again. The result, especially in my case, is that we became more observant.

Week 8: color

Image
This week, we continued delving into color still life. The items were brought in by Prof. Garguilo and placed into still life settings. We actually began this painting on Thursday of week 7 and continued into week 8. W The setups were full of complimentary colors and we were to choose 4-5 items with an interesting composition. We were to concentrate on details and shadows, as well as the interesting interactions of the colors. Here's is pictures of the setup, including the portion I chose to paint. After the first class, everything was blocked or at least drawn in, however, the color of the sheet was off and I had a lot of detail work to do. In the second class, we had more time to work and the result was much better. I was able to see that the sheet actually had a green undertone. I think in the end, I was the only one to catch that and while my green shade was too dark to begin, I was able to tone it down. Again, I am having trouble with shadows and I am begin

Homework: Color Mixing Completion

Image
After a full day of mixing colors, I finally managed to get all 20 colors done. I enlisted John to go.around the house and find color samples for me. What is remarkable is how few actually different colors I have in my house. He would bring me something and it would match another sample I had already mixed. So the search would continue. In the end, I managed to find 20 samples and did an alright job matching. It turns out I did choose one item that I could not recreate the color because we do not have the proper base color. However, here are my finished samples alone and then with the items I used. I did have some too dark and some too light. That will take practice. I also redid the block paintings with proper complimentary colors. Much better perspective in both pictures this time.

Week 7: More Color

Image
I brought in crazy vegetables today, which made my job more challenging, but I have to admit, more fun as well.  My only problem was defining the green/brow/gray color in the stripes. With help from Prof. Garguilo, we came up with something similar. Still having some perspective issues, but this painting was much better than the last.

Homework: Drawing, Color-mixing

Image
We had too much homework this weekend, and while I worked on it, I was only able to get some of each piece done in between grading. The first assignment was to do 2 drawings of still life at home. I managed one, which probably had too much in it, but I like how it turned out. Second assignment was to start mixing colors to make matches to items we find. The hard part of this will be finding samples as he has limited us to 3 of any one kind of sample, for a total of 20. My start is nail polish. The top is my colors and the bottom the nail polish. I may have to to-do 2 of these now that they are dry. The third assignment was to gesso a page in our sketchbook and draw two different angles of our little white cubes. From there, we are to use monochromatic scale from a primary color to paint the values. I managed to do things backward. I drew my cube before I gessoed, so will have to re-read the cubes before I can paint. I am not afraid to say that this is a LOT of homework