Posts

Personal Painting: Portrait Surprise

Image
Mom posted a really great picture of Bob just before Christmas. They were at Pizza Sam's and they both looked so happy. I decided I could use that picture to paint a portrait of Bob for Mom.  Here is the picture and the close-up I am using for the portrait: From this close-up, I started by drawing the portrait. I did this before Christmas and at first wasn't convinced. So, it has sat for a couple weeks for me to start painting. But I finally decided that without fine detail it is really hard to see what it will look like finished. And besides, ever other time I looked at it, it did look like Bob. So, today, I decided to take advantage of the Open Create at Captured Community and start working on it. I worked for About 2 hours and it started coming together. I have a lot of work to do, but I feel like it is coming along. So, here is the first round of painting.

Last Homework: Self Portrait in the Style of Alice Neel

Image
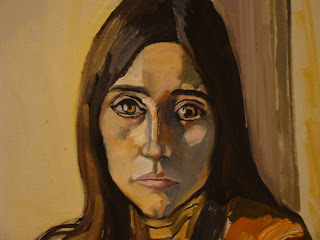
The challenge of our last homework project was to create a self portrait in the style of Another painter. I chose Alice Neal because my initial drawing had shade of her work.  The real challenge, after having worked so long on my realistic portrait, was to not stray away from the style I had chosen. I am not positive I have managed to meet that challenge. The following is one of Alice Neel's many portraits as well as her self portrait. Alice Neal was a well-known and prolific portrait painter, having painted portraits of Andy Warhol, for instance. Her influences were German and Euro-expressionist. Ironically for me, she shunned the impressionist artists that were such a strong influence on painters of that time. I too, am influenced strongly by Renoir and Monet.  So, It seemed a bit strange to be so drawn to her work. However, what drew me most to her work was the expression in the eyes. And that is where I tried to stay true in my painting. When I started this mo...

Final Project: Last Class Workday

Image
Today was the final push. When we arrived, we were told it was time to add some cool highlights. Prof. Garguilo said he would come around and work with us individually, so I set forth with working on the background. After short discussion, we decided I should start by painting a thin coat of alizarin red onto the current background. That could then dry really well while I was working on the rest of the portrait, so when I did the glaze later, it would be ready. After painting on the alizarin red, I was really tempted to just leave it that color. However, it was time for me to work on smoothing the contours, so I had time to decide. I had chatted with Prof. Garguilo during the last class session about using dry-brushing to Smooth the contours, so the piece I was missing was how to mix the cool flesh-tones. I grabbed him quickly for a demonstration and then set to work.  The key here was to establish a range of flesh-tones that would ease the shadows Into the lights and then use...

Final project: Self Portrait, Class 3

Image
We continued working on our self portraits today. I am struggling because I cannot visualize how to blend the contours. I did a lot of work today on fine details. The first thing I did was adjust the eyes. I had painted them too blue, so they needed to be adjusted. I added a little cadmium yellow to my blue to change the shade to one more slightly green. Then I worked on details with the irises. The result was far more realistic.  I will admit, getting these right was kind of weird for the rest of the class. I felt like I was being watched the rest of the day. I then moved on to the lips. I was told by many that I had the wrong color. And they were looking rather flat. So, I worked on these quite a while trying to get the values corrected so that they looked more like true lips. I am not sure they are quite there yet, but they look better. At this point, Prof Garguilo discussed with us what we will do with our background. This is when we found out one of the reasons...

Final Homework: Self Portrait in the Style of Another Artist

Image
The final homework project we have to complete is to do a second self portrait in the style of another artist. While Prof. Garguilo has not yet posted the artists we can use, he indicated that my drawing had elements of Alice Neel. So, I took a chance and looked up her work and realized he was right. So, I decided to go ahead and start painting in that style. Here is an example of her work: This painting was accessed from The Modern Art Museum's Pinterest page. So, I moved forward with the background first. On this canvas, I had drawn the painting on the primed canvas, rather than painting a background first. I decided to use a varied of the skin tone, similar to the above painting. I also went ahead and painted the sweater. I love the folds of the hood!. The rest of the time was spent with the proper contouring and shading. For a first round, I am pretty happy with the results. I obviously have to finish the eyes as well. If I understand correctly, the next step is o...

Final Project: Day 2

Image
We started by watching a demonstration of how to blend skin tones. Then we were set loose to start our paintings. He encouraged us to concentrate on the facial shading, but because of our background washes, we all felt like the colors, which looked right on the pallet paper, made us look like zombies. My thought was that I looked like I had painted on face powder. It was rather disconcerting to many of us and soon we were wandering around trying to see if we were the only ones having that thought. After taking a break, I decided to fill in my shirt and hair, because I was pretty sure the issue was the orange wash background.  Once I did that, it did help a bit, but I also decided I did have some rosiness to my cheeks, so I added a bit of rosy color and it really woke up the painting. At this point, Prof. Garguilo said he thought it was coming along nicely, but that I need more value range, so the rest of class was spent remedying that and finishing my eyes and ears. In th...

Week 15: Self Portraits

Image
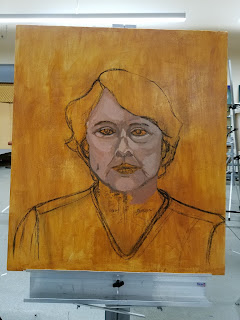
We began our last major project today during class. This will take at least four class periods.  We are doing self portraits. Not my favorite thing. However, at the beginning of class, Prof. Garguilo demonstrated his approach to drawing a self portrait with vine charcoal. His approach was to first lay out the proportions and then build the face from the center out. This made so much more sense to me than what I had been taught in all of my prior drawing classes. Before we started drawing, it was suggested that we paint a wash over the canvas to have a starting base. He used a wash of burnt sienna, but I felt that I have a more yellow base to my skin, so I mixed some yellow ochre with my burnt sienna. From there, we started laying out our faces. This is where mine started: Prof. Garguilo went around to each student and did some adjustments: In my case, he worked on my eyes. The rest of the class was spent adding details and values to the drawing. What I am pleased...